Toyota Highlander Service Manual: Windshield wiper motor ASSY
REPLACEMENT
HINT: Installation is in the reverse order of removal.
1. REMOVE WINDSHIELD WIPER ARM COVER
2. REMOVE FR WIPER ARM & BLADE ASSY LH
(a) Stop the windshield wiper motor assy at the automatic stop position.
(b) Remove the nut and the FR wiper arm & blade assy LH.
3. REMOVE FR WIPER ARM & BLADE ASSY RH
(a) Remove the nut and the FR wiper arm & blade assy RH.
4. REMOVE COWL TOP VENTILATOR LOUVER SUB-ASSY

(a) Disengage the 6 claws.

(b) Remove the 2 clips.
(c) Disengage the 9 claws, and remove the cowl top ventilator louver sub-assy.
5. REMOVE WINDSHIELD WIPER MOTOR & LINK ASSY

(a) Disconnect the connector.
(b) Remove the 2 bolts.
(c) Remove the windshield wiper motor & link assy by disengaging the pin as shown in the illustration.
6. REMOVE WINDSHIELD WIPER MOTOR ASSY

(a) Using a screwdriver, disengage the meshing of the 2 rods at the crank arm pivot of the windshield wiper motor assy


(b) Using a torx) socket wrench, remove the 2 bolts and the windshield wiper motor assy.
7. INSTALL WINDSHIELD WIPER MOTOR ASSY

(a) Apply MP grease to the clank arm pivot of the windshield wiper motor assy.
(b) Using a torx) socket wrench, install the windshield wiper motor assy with the 2 bolts.
Torque: 5.39 NVm (55 kgfVcm, 48 in.Vlbf)
8. INSTALL WINDSHIELD WIPER MOTOR & LINK ASSY

(a) Temporarily install the windshield wiper & Link assy by engaging the pin.
(b) Install the windshield wiper motor & link assy with the 2 bolts.
Torque: 7.0 NVm (71 kgfVcm, 61 in.Vlbf)
(c) Connect the connecter.
9. INSTALL FR WIPER ARM & BLADE ASSY RH
(a) Stop the windshield wiper motor assy at the automatic stop position.

(b) Scrape off the serration part of the wiper arm with a round file or equivalent.
(c) Clean the wiper pivot serration with a wire brush

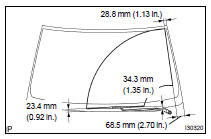
(d) Install the front wiper arm & blade assy RH with the nut to the position shown in the illustration.
Torque: 24 NVm (245 kgfVcm, 18 ftVlbf)
HINT: Hold down the arm hinge by hand in order to fasten the nut.
10. INSTALL FR WIPER ARM & BLADE ASSY LH

(a) Scrape off the serration part of the wiper arm with a round file or equivalent.
(b) Clean the wiper pivot serration with a wire brush

(c) Install the front wiper arm & blade assy LH with the 2 nuts to the position shown in the illustration.
Torque: 24 NVm (245 kgfVcm, 18 ftVlbf)
HINT: Hold down the arm hinge by hand in order to fasten the nut.
(d) Operate the wiper while running water or washer fluid over the window, and check the wiping condition and that the front wiper does not scrape against the body
 Inspection
1. WINDSHIELD WIPER SWITCH ASSY
(a) Continuity Check
Measure the resistance according to the value(s) in
the table below.
Standard:
Front Wiper Switch
Front Washer Switch
...
 Wiper rubber LH
REPLACEMENT
HINT:
Use the same procedures for the RH side and LH side.
The procedures listed below are for the LH side.
Installation is in the reverse order of removal.
1. REMOVE FR WIPER ...
More about Toyota Highlander:
Inspection
1. INSPECT V (COOLER COMPRESSOR TO CRANKSHAFT PULLEY) BELT NO.1
(a) Belt tension:
Using a belt tension gauge, check the V belt tension
NOTICE:
Check the V belt deflection at the specified point.
When installing a new belt, set its tension value as
specified.
When checking a ...
